Showing posts with label Sewing. Show all posts

Tuesday, 20 August 2013

A Fairy Apocalypse

Another mile of time without a post, I promise I have not been lapsing. I've been surrounded in fabric, pins, html code and letters, not to mention trips back and forth to Wells-next-the-Sea where my parents, sister, and four nieces and nephews have been holidaying.

Have I got little treats for you, in the first of a flurry of posts.

A new venture for Binky Roo has been Art Dolls.

I have made three different kinds of Art dolls to date, with more coming in the future.

FLYING FAIRY ART DOLL


This is a blue floral themed 9.5" Flying Fairy

This is a red and black rock themed 9.5" Flying Fairy

This is a red gingham themed 9.5" Flying Fairy
The flying fairies are beautifully sculpted by hand and take time. Each doll has it's own accessories which make them doll unique. They are accessorised with beads, all hand sewn and are made from designer fabric.This is the cheapest of my Art Dolls and look gorgeous flying in a corner of a room .

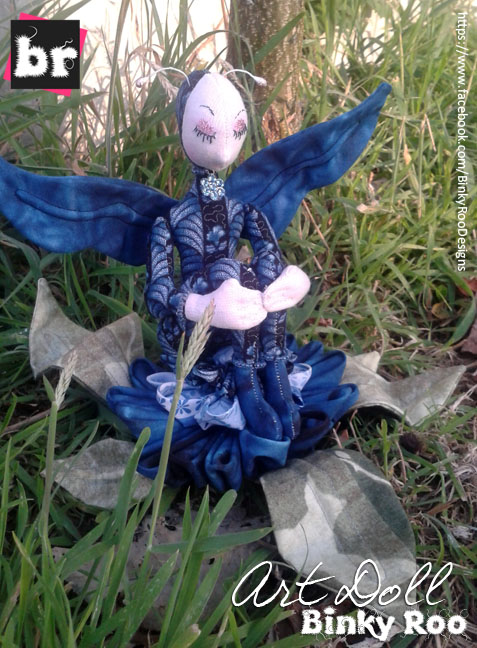
SITTING FAIRY ART DOLL


The sitting doll, priced ever so slightly higher than the Flying Fairies, are gorgeous. Sitting on three fabric flowers and 5 fabric leaves, this little fairy looks like she's sleeping or meditating, so peaceful. Although the fairy is the same scale as the flying fairy, her sitting pose stands her at 6.5" tall. Her eyes can be open or closed, and different wing patterns can be used.

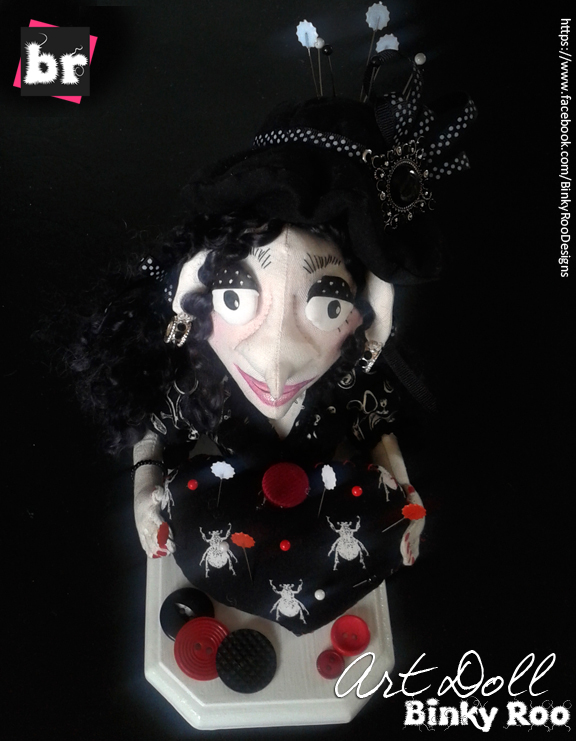
PIN CUSHION ART DOLL


Meet Griselda. This little gem is a necessary accessory to every sewing room or sewing area and not only is she a necessary accessory, she is a gorgeous accessory. I love Griselda! and even though it took about two projects before I'd dare use her, she has now helped on many of my sewing projects. This art doll is practical and unique. The pricing of art dolls has to be mentioned as this is the only project I will say, hands up, that takes a lot of time and precision.

WHAT ARE YOU PAYING FOR?

The pin cushion art dolls are sculpted by hand and takes time. Each doll has it's own accessories which make each doll unique. Griselda, pictured, has a lovely Onyx-like pendant as a hat brooch, Onyx-like and silver plated charms for earrings, and a spider charm around her neck. She is accessorised with beads (necklace, bracelet and ring), all hand sewn. She is made from designer fabric made up as a head, torso, arms, eyes and ears. Her lips are hand painted and a bit of blusher applied. A blouse is made to fit, and he hat is also made from scratch. Her hair is hand-sewn on to her scalp and detail added to her pin cushion . She is mounted on a painted MDF base with buttons. A lot of time and energy goes into making each one unique. She stands approx 7.5" tall including the base, which is 6" x 4".

The blog is brought to you whilst being invading by the original band members of The Wiggles so my son can dance about. The worst thing about this is I can feel myself head bopping and hear myself singing along.


Tuesday, 12 February 2013

Home Storage - Designer Plastic Carrier Bag Dispenser

The finished designer carrier bag dispenser

This is something I've been intending to make for quite some time. EVERYBODY needs a plastic carrier bag dispenser. For this to look stylish it was important to purchase the right fabric. I didn't do cheap, I went designer!

Three beautiful designer fabrics for the dispenser

The colours compliment each other beautifully. I had originally wanted to make a blue and black one but the red fabric kept leaping out at me when I was in the fabric store.

The top and body ready to be constructed
 There is an opening at the top to put the carrier bags and then it's as simple as pulling one out from the bottom as and when you need one.

The body of the dispenser complete
The top and the body attached together

The detail gets even better with a contrasting colour thread running across the edge of the black/grey fabric, in this case red. The designer of the pattern, Alicia Thommas (s4h), has done a wonderful job.

Want your own designer carrier bag dispenser? For £ 1 9 . 9 9 it could be yours. Contact me with colour/pattern scheme. 

Saturday, 9 February 2013

Custom Softie - Darla the Lamb

Awwwww! now this was pretty special to make. Tilly's little lamb.

[caption id="attachment_175" align="aligncenter" width="576"]Darla the lamb with bells Darla the lamb with bells[/caption]

Made from designer cotton fabric, Tilly's newborn babygro, felt, with hand stitched detail. This was such a pleasure to make. This was making an already beautiful pattern by Dolls and Daydreams into something so unique and special. Tilly's mum even chose the designer fabric. Who said owls and sheep don't go together?

[caption id="attachment_176" align="aligncenter" width="576"]Darla in all her glory, made from designer cotton fabric and Tily's newborn babygro Darla in all her glory, made from designer cotton fabric and Tily's newborn babygro[/caption]

This was a bit of a challenge because of using the babygro (a very stretchy fabric). The babygro was used for the inner ear, paws, and front of the body.

[caption id="attachment_174" align="aligncenter" width="576"]Darla's little bottom, Tilly's name hand embroidered Darla's little bottom, Tilly's name hand embroidered[/caption]

This is Darla. A little bell around her neck with a series put inside with the stuffing. Tilly's name embroidered on the back with her date of birth, making it just that little bit extra special. This was one of the creations that I have made that I really didn't want to give away, but it is a very lovely new home.

Custom Dolly - Maggie the Flower Girl

After doing two gothic dolls, Betty Lou and Nancy, and a Christmas Doll, Sweet Angie, it was soooooo lovely to make a girly doll - pink and flowers and all. This little lady is adapted from lovely Sarah's pattern from Dolls and Daydreams. Using cotton, felt, ribbon and hand embroidered details. I love Maggie with her blonde pigtails and pink floral outfit, even her tutu has little sequins on.

45155_10200272993012609_1960601484_n

I knew that this little dolly had to be pink with blonde hair and little pink cheeks, just like the little girl she was made for. What made Maggie different from the gothic dolls I have previously posted, apart from the little pink cheeks, is that her hair also had matching ribbon weaved through.

[caption id="attachment_169" align="aligncenter" width="576"]Little pink cheeks and ribbon in her hair Little pink cheeks and ribbon in her hair[/caption]


Handmade Bag - Retro Green Tote

I have recently been pouring over crafting/sewing website looking for new ideas and inspirations. For 2013 I want to expand and have a nice flow of handmade bags to join the dolls and softies. This tote bag was the first bag I made.

[caption id="attachment_159" align="aligncenter" width="576"]DSCF9087 The beginnings. Look how the grey/silver taffeta compliments the grey of the fabric on the right.[/caption]

The fabric I used for this was a medium/heavy upholstery weight fabric with a taffeta lining. The buttons on the side were lovely vintage buttons from my late mother-in-law's tin.

[caption id="attachment_160" align="aligncenter" width="583"]The search for the right lining was a long task. I have mixed feelings about taffeta but this just lends itself so well to the design. The search for the right lining was a long task. I have mixed feelings about taffeta but this just lends itself so well to the design.[/caption]

The original design for this bag is by Alicia Thommas and Liz Johnson (s4h) and was designed to be carried by straps held on by buttons/button holes. Since the sewing machine I used for this was a four stitch machine (so no button hole ability), I stitched the straps on.

[caption id="attachment_162" align="aligncenter" width="608"]Vintage buttons really sells this retro tote bag Vintage buttons really sells this retro tote bag[/caption]

Upon finishing this bag I have to admit, I was impressed. This bag has to go into the Binky Roo collection. This design is retro and stylish with a double pocket inside and out - the inner pocket stitched to hold a mobile phone and a small notebook/diary.

This is the first of two bags of this design I will be uploading on here. Keep an eye peeled for a detailed post for a designer tote - Nevermore - Michael Miller Fabrics. It's goth, it's lush, it's unique...

[caption id="attachment_163" align="aligncenter" width="583"]The final bag showing the fussy cut detail of the external pocket with handmade frill The final bag showing the fussy cut detail of the external pocket with handmade frill[/caption]

Friday, 18 January 2013

Felt Craft - Cute Bags

I hope you all had a wonderful Christmas and New Year. I hadn't forgotten about you all, I had been on a crafting frenzy throughout December ready for Christmas but, of course, could not upload the creations until after Christmas. So here is the first of several special Christmas posts.

If you have been following my blog you will know I recommend Felt Friends from Japan: 86 Super-cute Toys and Accessories to Make Yourself by Naomi Tabatha. These bags are one of the 86 projects in the book.

You will need:
Felt Template from Felt Friends from Japan by Naomi Tabatha
Wool Felt for the Bag (sizes needed in the book)
Felt for the applique
Matching Floss
Needle
Scissors

[caption id="attachment_140" align="aligncenter" width="583"]Little Girl and Flower Felt Bag Little Girl and Flower Felt Bag[/caption]

I have eight nieces and nephews on my side of the family and I like to make things for them if I can. I desperately wanted to make two of my younger nieces one of these bags - I had wanted to make one 'just because' but since I have no room I have to often find people I can give some of my experimental crafts too. If you saw our house and how packed it was with stuff we love you would see why.

[caption id="attachment_143" align="aligncenter" width="364"]Attaching a little handmade lable inside will let others know you took the time to make something special Attaching a little handmade lable inside will let others know you took the time to make something special[/caption]

The little girl bag took a long time to put together. The applique was fiddly as I had made a smaller bag size than the one recommended for this design. I sewed each section on the bag separately as I didn't want to keep changing thread as I got to the next colour felt.

[caption id="attachment_142" align="aligncenter" width="583"]Felt Cats on Hot Pink Bag. Felt Cats on Hot Pink Bag.[/caption]

Much to my surprise, the cat applique was my favourite. Against the hot pink of the bag and the easiness of the applique, it made for relaxing sewing. I would happily do this one again.

[caption id="attachment_141" align="aligncenter" width="576"]The two felt bags together The two felt bags together[/caption]

Rating:-
Design: Felt Template from Felt Friends from Japan by Naomi Tabatha
Level: Beginner/Intermediate (The bag and cat applique are great for beginners - there are more designs to choose from too. The little girl applique is more for intermediate felt crafters)
Additional: Becareful of the thickness of the felt for the actual bag. Wool felt that is too thin will just pull apart, especially when tying the knots around the bag.

Monday, 17 December 2012

Custom Dolly - Sweet Angie

EIGHT more sleeps! It's funny how once you have a child you start to count the sleeps until an event. This event, of course, is Christmas! It never used to be a favourite time of the year. In fact, only five or so years ago I would have quite happily held my hands up and said I was the female version of Scrooge. Since meeting my husband Christmas is special again. My lack of posts has not been due to a lack of making, quite the opposite - I haven't stopped! However, these are Christmas presents and therefore have to remain secret until the big day - I wouldn't want to give away the surprises I have made.

Sweet Angie, the Christmas tree angel
On the top of the tippy, tippy top of the tree
~ Andrews Sisters

Sweet Angie the Christmas Tree Angel - snug in her cape Sweet Angie the Christmas Tree Angel - snug in her cape


I can show you Sweet Angie though. After completing all the Christmas surprises I decided to make me something - something I rarely do. Our Christmas tree was erected on December 5 - earlier than normal. Since my gothic doll, Nancy, I've been obsessed with making dolls and softies using Sarah's 'Dolls and Daydreams' patterns. Sarah had been 'sharing' photos of dollies made by other crafters on her facebook page. The little red riding hood doll was appearing to be a very good pattern to adapt into a Christmas doll.


Whilst I was finishing up a couple of dolls/softies my husband had sent me a file of Christmas music - well a file of files which were labeled with different genres etc. There was one called '40s' and in there was the Andrews Sisters - Christmas Tree Angel. I fell madly in love. The song and the photos on Sarah's page inspired me to make my own Sweet Angie.


She's about 2/3 of the original size with a reversible cape.


[caption id="attachment_132" align="aligncenter" width="589"]Sweet Angie in her Faux Fur Clock Sweet Angie in her Faux Fur Clock[/caption]


FABRICS:
Ivory Matt Satin
Ivory Shimmer Organza with Butterfly Motif

Faux Fur - Short Hair Curly Red
Beige Polycotton
Brown Felt


I used a plain beige polycotton (doubled) for the head, arms, and legs, and felt for the hair. For her body/dress I used a matt satin layered with the organza, and finished off with the reversible cape using both the matt satin and the curly faux fur. Finally she was stuffed using hypo-allergenic poly-stuffing.


[caption id="attachment_133" align="aligncenter" width="575"]'...on the top of the tippy tippy top of the tree' '...on the top of the tippy tippy top of the tree'[/caption]


Sarah's patterns are all lovely and there is a lot of flexability and room for customisation. With Sweet Angie I embroidered her face and name. The font heavily inspired by the Crazy Girlz font. Angie will now be part of our family Christmas tradition - pulled out once a year to sit on the top of the Christmas tree and to protect the gifts below.

Monday, 19 November 2012

CUSTOM DOLLY - Betty Lou for Nikki

There isn't a better feeling out there than making a a keepsake or gift that you know is going to be loved. When Nikki asked me for a 'Nancy Doll' but with purple ribbon and tutu I got excited - I get to make another Nancy. You see, I love making things but I do not have the space or need for a lot of the things I make, so making for others makes me happy.

FABRICS:
Victorian Flock Taffeta Damask
Shimmer Organza
Satin
Polycotton
Felt

Betty Lou sitting up with her tutu on

Betty Lou (and Nancy) is a more expensive handmade doll due to the embroidery. The heavy embroidery on her face meant that I needed to double up my fabric so it didn't pull. There is also an embroidered spider web and black widow (complete with seed beads) on her black Victorian flock dress, and the tutu consisted of doubled up purple satin and organza carefully sewn so it wouldn't fray. Stuffed with hypo-allergenic poly-stuffing.

Betty Lou next to her tutu


[caption id="attachment_116" align="aligncenter" width="645"] Personalisation can make a special handmade dolly into something precious[/caption]

I had seen gothic handmade dolls go for around $120, and although it does take time to embroider I want to maintain affordability. Betty Lou came in at £28.00 personalised.

Betty Lou was a pleasure to make and I'm sure she'll be well loved in her new home.

FELT CRAFT - Sannie & Danny Felties

My step daughter from a previous marriage just turned 18. Anyone with teenage kids will understand when I say that they really do grow up fast - I remember when she was six and we went shopping for trainers in the local market. I have been blessed with maintaining a lovely friendship with her, one that I will always treasure. So when her 18th was fast approaching I wanted to do something special and I still had felting fever. Stephen suggested a CD with every music track that was number one on her birthday every year. The two felt plushes would represent the artist who was at number one when she was born and the artist who was number one on her 18th birthday.

[caption id="attachment_94" align="aligncenter" width="672"] Sannie and Danny in their presentation box[/caption]


In 2012 Danny O'Donoghue of The Script, was at number one with 'Hall of Fame' feat. Will.I.Am.


I wanted to have another go at the bunny, like Celeste, from my Felt Friends from Japan book, but this time I wanted to add a twist by using patterned felt. Have you ever tried to get patterned felt? I could only find animal print and dots. So I took to Ebay. Still, very few options. Then I found the most beautiful paisley design.


[caption id="attachment_97" align="aligncenter" width="606"] Danny the Bunny made from paisley felt[/caption]


In 1994 Sannie 'Whigfield' Carson was at number one here in the UK with 'Saturday Night'
- oh the memories that song holds, dancing with a group of kids I didn't know at a Folkstone hotel


Since completing another bunny I wanted to create her play-mate, a faun. Using the same patterned felt and the template from Felt Friends From Japan I achieved Danny's little pal. The paisley felt couldn't have worked any better.


[caption id="attachment_99" align="aligncenter" width="636"] Sannie the Faun using paisley felt[/caption]


Much like Celeste I created a gift/presentation box. Taking the paisley theme that had emerged I made the box following a similar template to that of Celeste's but made the window slightly different and made it more shallow, resting the felt plushes on a sheet of organza.

[caption id="attachment_95" align="aligncenter" width="672"] Sannie and Dannie on their organza[/caption]

Making such a beautiful gift is certainly worth it when it is appreciated. I wouldn't mind making these for myself using the paisley felt too.

Rating:-
Design: Felt Template from Felt Friends from Japan by Naomi Tabatha
Level: Beginner/Intermediate
Additional: Making a display box can really set of a 3D gift perfectly and with a 3D felt keepsake the organza roll gives it that professional look. When attaching the heads of both of these little animals, sit it on a flat surface and manipulate the head until it sits comfortably. Check this several times whilst attaching the heads.


FELT CRAFT - Bird Hanging Decoration

I moved to East Anglia from the Midlands in 2004. My family remain in the Midlands but I have created my own family here, and have made the most wonderful friends. One special friend came from out of the blue. Stephen teaches a Creative Writing course for a  major university here in East Anglia. In the Winter of 2010, half way through one of the courses, we found out we were expecting our son Vincent. At the same time one of Stephen's students also revealed she was expecting. We became close and shared our pregnancy experiences. I hated the experience of being pregnant but loved the new friendship that developed. In July 2011, a week apart to the day, our babies were born.

[caption id="attachment_87" align="aligncenter" width="610"] Hanging Decoration - Felt Birds and Flowers[/caption]

Since I made Celeste and Millie I was really in the mood to keep the felt crafting going. This time I wanted to make something different. The bird designs came from researching bird felties and taking inspiration from different designs and then incorporating the chosen colour theme (the colours that are in my friend's home) and flowers - designs taken from Felt Friends from Japan book.

[caption id="attachment_88" align="aligncenter" width="540"] Bird and Flower Hanging Decoration[/caption]

The hanging decoration was complete with two cat bells - yes, that's what I said, two cat bells. I couldn't get to my local craft store and it was far too close to my friend's birthday to order online so I improvised and sent Stephen to the local pet store to get three cat collars for Bubbles, Felix, and Syd, and took the bells of two of them. I really worked.

[caption id="attachment_86" align="aligncenter" width="608"] Gift Bag with a friendship quote on the sides[/caption]

Next I wanted to present them in something other than boxes. At this point I had had enough of making boxes, so I made a gift bag with acetate windows, friendship quotes, diamantes, ribbon, and lined with, my never ending supply of Organza.

I love to make for special people and this friend, Helen, is one of the most special people I've ever met!

Rating:-
Design Medium: Felt
Level: Beginner
Additional: Making a gift bag can really set of a 3D gift perfectly

FELT CRAFT - Celeste the Bunny

This is the first night I am sitting here feeling a bit of a chill, a chai latte with cinnamon wouldn’t go a miss but alas a cup of tea will have to do. Today was a bit of an adventure for me. This morning I went to the tattoo parlour where I’m having an old tattoo covered up tomorrow and the opticians to change our contact number. Our landline phone has decided that working with an active wifi is just far too difficult for it. Then onto a meeting point where I met with a friend’s daughter, Rose. It was her 20th birthday at the weekend, my husband has been a friend of her mother’s since well before she had children. Rose had invited us to her birthday bash but we couldn’t make it for lack of a baby sitter. Not wanting to completely let her down I decided to make her something special. She is the daughter of a very special friend therefore deserved it as far as we were concerned.

[caption id="attachment_80" align="aligncenter" width="539"] One eared bunny - Celeste in process[/caption]

Celeste the Bunny was created using one of the best books for crafting that I have come across, Felt Friends from Japan by Naomi Tabatha (watch out for my review). You start off by making the head of the bunny following the steps for the bunny’s faun friend. Their heads are identical. I did, however, decide to sew the eyes on as apposed to sticking them on with glue. The ears were somewhat of a surprise. No stuffing required. I thought they’d be floppy but they weren’t. In fact, to my surprise, they were mouldable. So I curled Celeste’s ears.

[caption id="attachment_77" align="aligncenter" width="596"] Celeste - Profile[/caption]

The body was much more simple. Although at first sight one would think that the body was far too smallbut upon attachment you realise it really works. I didn’t put the neck all the way into the head for attachment because I knew I wanted to add a ribbon to her neck. Celeste stands 9″ tall.

[caption id="attachment_76" align="aligncenter" width="623"] Celest Complete in her box[/caption]

The box, however, is completely my own template although the window in the lid is heavily inspired once again by the gazebo box used in several of my other projects. I chose the backing paper from my favourite download website and changed the colours to suit. The box is put together in the same way as the gazebo box.

[caption id="attachment_79" align="aligncenter" width="617"] Celeste lying on her Organza[/caption]

The box is deep and is lined with organza which Celeste is lying on. The lid is finished with ribbon and diamantes. The whole thing looks so much more special when displayed in such a gift box.

Rating:-
Design: Felt Template from Felt Friends from Japan by Naomi Tabatha
Level: Beginner/Intermediate
Additional: Making a display box can really set of a 3D gift perfectly and with a 3D felt keepsake the organza roll gives it that professional look. Be careful not to make it too deep, this one was.

FELT CRAFT - Millie the Manatee

As most of us British have no problems in complaining about the weather I will not let the side down when I say, IT'S TOO HOT! However, it’s a lovely day for a very special someone who found out today she passed her AS levels (one more year to go!). We are so very proud.

I never really know what to do on these kind of hot days. I mostly want to stay in out of the rays – I’m white than white (the little blimp that spacemen can see walking round on the planet as the sun bounces of my lily white skin) therefore if I emerge from my four walls I’m likely to spontaniously combust. It’s always nice to have a chat with friends in the Summer though. The hot weather giving socialising a more pleasurable accomodation. This project is dedicated to my neighbour and friend, Louise.

I’ve never been a fan of neighbours. My property is quite large for a suberban place. We have a lovely sized front and rear garden and are hidden behind the main stretch of houses (even googlemaps with it’s super fantastic photographic view of every street cannot see my house). We are up a longish drive whereby there are two properties, mine and Lou’s. However, the driveway belongs to us giving our neighbours access only. Over the years the battles we’ve had with neighbours regarding the use of the drive had become boring and frustrating, the previous neighbour blocking us in nearly every night whilst I was heavily pregnant (couldn’t even fit our motorbike between the vehicles). When the new neighbours moved in Stephen and I were on pins again. As it turned out we have super duper neighbours who I’ve told can never ever move – we’re now good friends and our babies play together.

[caption id="attachment_68" align="aligncenter" width="674"] Milli the Manatee in her box[/caption]

So when it came to Lou’s birthday I couldn’t resist a new challenge. Our Lou loves Manatees -sea cows. And there the challenge begun. I searched for crafted Manatee’s and found a great felt template from craftster.org. There were no instructions so it was a guessing game as to how it was constructed but I got there in the end.I constructed this using the inside out method. First I sewed the fins and lightly stuffed them. I then took the two sides and sewed the top part of the sides together stopping 2/3 of the way to the snout. I then began to attached the belly piece not sewing the tail as I had decided that was were I was going to turn it inside out and stuff at the end. Before reasching the snout I placed the fins in the correct place sealing the stuffed fin as I went along. The snout was a bit complicated but by leaving the third of the top open it allowed me to stitch it as neatly as possible.

[caption id="attachment_69" align="aligncenter" width="672"] Milli the Manatee on her sea of Organza[/caption]

I then turned the manatee the right way and sewed the face details – I’d probably advise getting little black eyes rather than sewing with black thread as I have on this one. Stuffed her up and closed her by the tail.

[caption id="attachment_67" align="aligncenter" width="652"] Milli the Manatee on top of her box[/caption]

Since I loved the box to the wedding gazebo so much I used the same template but changed the backing paper and shrunk it to fit the manatee. I placed in some pale blue fabric and tied a lovely bow around the manatee, finishing the gift.

Rating:-
Design: Felt Template
Level: Beginner/Intermediate (this would be wonderful for beginners had there been instructions)
Additional: Making a display box can really set of a 3D gift perfectly